
How to Create Realistic Animation


Bottom image courtesy of Melissa Chan of The Daily Paw.
The pictures above show a drastic difference in animation.
The top photo is from Disney and Pixar’s Toy Story (1995). It was the first, full-length animated movie created with computer-generated animation, which changed the animation industry as more studios abandoned traditional animation methods.
The picture on the bottom is from a trailer for the newest installment in the Toy Story franchise. Toy Story 4 will be released in theaters this summer and already, it is serving as an example of the massive difference in how realistic animation can appear.
While lifelike animation is made easier with advanced technology, it cannot account for everything. Training and practice are some of the most important elements that go into creating realistic animation. Knowledge in anatomy, lighting, and even texture is important for realistic art. But making an animation mimic life goes beyond just the visually appealing.
Movement is a huge aspect of animated films and animators must know how to make these actions seem realistic since characters and objects are almost constantly in motion. To ensure that these actions look lifelike, there are twelve rules that every animator or future animator must learn.
The Twelve Principles of Animation
The Twelve Principles of Animation are the translation of physics into art and are the fundamental guidelines for animating. They were first identified by Disney animators Frank Thomas and Ollie Johnston. Together, they worked on dozens of famous films, like Snow White and the Seven Dwarfs, Lady and the Tramp, Peter Pan, Alice in Wonderland, and more.
As some of the first animators for Disney’s studio, they were pioneers in an artform that was relatively new. Because of this, they made groundbreaking realizations when it came to creating realistic, animated characters.
Their discoveries were highlighted in a book they co-authored in 1981. The Illusion of Life: Disney Animation introduced the Twelve Basic Principles of Animation to the world. Thomas and Johnston’s rules are now taught in every animation course and their book is often called “the animation bible.”
The principles the book covers are squash and stretch, anticipation, staging, straight ahead and pose-to-pose, follow through and overlapping action, slow in and slow out, arcs, secondary action, timing, exaggeration, solid drawing, and appeal.
Together, these principles create realistic movement and characters within an animation.
Squash and Stretch
Squash and stretch is the first principle of animation and is often seen as the most important concept of the twelve.
This rule states that when another force acts upon an object, the object does not stay the same. However, it must retain the same volume. For this reason, an animator must make the object appear as though it is being squashed and stretched by the opposite force. Doing so creates a sort of reaction while keeping the object’s volume the same.
This rule is especially important as it conveys the concept of gravity to viewers.
The classic example offered in beginning animation lessons is a bouncing ball. Look at the image below.
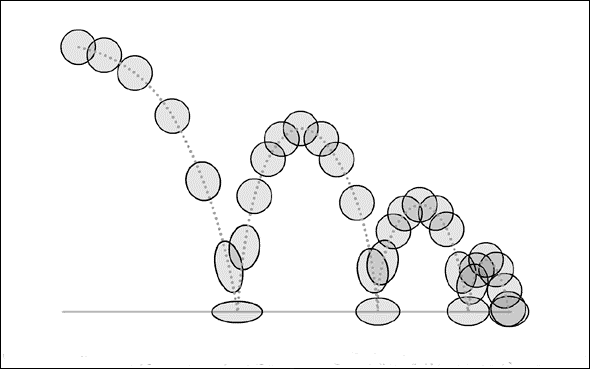
Image courtesy of Dermot O’Connor of Angry Animator.
The outside force acting on the ball is gravity, which will cause the ball to fall to the ground. Gravity does not stop acting on the ball after it hits another surface. Instead, it continues to press the ball down before it bounces.
Therefore, an animator will draw the ball squashing or stretching into an oblong shape to retain its volume and make it appear as though it is still reacting to the other force.
Anticipation
Picture a soccer player. When the player kicks the ball, they must wind up for the motion by drawing back their leg and their arms move away from their sides to help them balance.
These other, smaller motions leading up to the kick are what an animator must use in the basic the rule of anticipation.
This idea encompasses the basic concepts of motion. Major actions are prefaced by smaller ones and animators must be observant of these actions if they want to create realistic motion. These smaller actions can also be used by an animator to act as a visual cue for an audience.
A viewer can see this in the GIF below, which features a clip from the classic holiday short A Charlie Brown Thanksgiving.
GIF courtesy of GIPHY.
When Charlie Brown twists his arms back and lifts his foot, the animator is subtly letting their viewers know what Charlie Brown is about to run to kick the football Lucy is holding.
Staging
Staging has less to do with the concepts of physics and motion, and more to do with planning. Animators must decide what they are trying to convey and how they will convey it before they begin the process of drawing.
This is where staging comes into play.
The idea of staging is to use all of the characters or objects’ motion to one’s advantage. Instead of relying solely on camera angles to emphasize the most important part of a shot, an animator will use other movements to draw attention to the crucial elements in a scene. However, staging also forces an animator to think about their camera angles, and what they can tell an audience.
An excellent example of this principle in play can be found in the photo below.

Photo courtesy of Dermot O’Connor of Angry Animator.
The second angle portrays the character behind the desk as evil and if the other individual is moving toward the desk, then the audience’s eye will be drawn to the villain. The overall effect will be an emphasis on a character who looks frightening, rather than mildly annoyed.
Straight Ahead Action and Pose-to-Pose
Thomas and Johnston do not outline rules for movement in this principle. Rather, they introduce the two different approaches to the animation process in both traditional and 3D methods.
Straight ahead action refers to the animating process where each, individual frame is drawn sequentially. This method is effective for creating highly realistic movements that mimic life.
Pose-to-pose dictates that an animator draw only the key frames, or main poses, of a scene first. Then, the animator returns to draw the motions between each key frame afterwards. This can be unpredictable but helpful when trying to build emotion.
Most animators find themselves somewhere in between the two different methods.
Follow-Through and Overlapping Action
Think about a marathon runner. When they cross the finish line and come to a halt, they do not come to a complete stop all at once.
Momentum continues to carry some parts of their body. Their arms may bounce forward and if they have long hair, it will continue to move past their shoulders and head as that momentum drops. The hair of the marathon runner is following through on the action that has just stopped and overlaps the ending of that action.
Animators must know that when movement begins, it must be sustained after the action ends and therefore, draw these extra movements to ensure that their character looks realistic. Take this GIF of Professor Ratigan from Disney’s The Great Mouse Detective as an example.
GIF courtesy of GIPHY.
Ratigan’s cape continues to move in one way even after he starts dancing in the opposite direction. It follows his movement only a second later.
The concept can sometimes be seen in title sequences for movies. When the words of a title slide on screen, they bounce back before stopping completely. Coming to a full halt with no follow-through or overlapping action makes an animation look awkward and stiff.
Ease In and Ease Out
Momentum also plays a key role in the next principle, ease in and ease out.
The idea conveyed in this rule is that speed and momentum do not remain constant. The example offered most often in beginning animation courses is driving. A car does not go from zero to sixty miles an hour as soon as someone presses on the gas pedal.
Another example is a metronome. The pendulum of the metronome seems to move slowly as it completes its arc and as it begins to move back towards the center. However, it gains speed as it nears the middle of its arc. The example of the metronome and the car prove one thing animators must remember: momentum and speed are gradual processes that begin and end slowly.
For this reason, animators will slow a character or object’s movements down as the action begins and as it ends. They will place more frames in these sequences and less in the middle to create this effect.
Arcs
An animator’s goal when complying with the principle of arcs is to avoid straight lines in movement. Instead, the idea behind this rule is to add circular paths to motion, because actions are hardly ever completed in a straight line.
This is because straight lines do not exist in organic motion. Robots or machines will move in straight lines, but humans, animals, and some other objects do not. This is why the dance, “the robot,” looks so strange.
Picture a construction worker hammering two pieces of wood together. They raise the hammer back in an arc and follow that same circular path down to the nail.
This can be seen in the GIF below.
GIF courtesy of GIPHY.
The animator who completed this work has focused on circular motion. When SpongeBob moves the hammer down, his motion is curved. Even his eyes follow a curved path upwards and back down, rather than moving in a straight line. If the animator had drawn straight paths of motion, the movements would look awkward and unnatural.
Secondary Action
Secondary actions are just like what they sound. They are movements that are smaller and subtler in nature because they are not the main focus.
Animators use secondary actions to add interest and to emphasize the main action. These movements can help convey the emotions of a scene or give the audience a glimpse into what a character is thinking or feeling while adding depth to them.
Take the video below as an example. The jumping of the larger bag is the main action. The secondary action of the smaller bag jumping adds interest to the movement and adds a little depth to a scene that would have otherwise been bland.
Video courtesy of YouTube user Brown Bag Films.
Timing
This principle is straightforward as well. Timing dictates that the actions or movements of a character must not be too slow or too fast.
Animators will sometimes bend this rule since they can afford to push boundaries in a fictional world. However, breaking away from the principle must be done in the right place and at the right time.
Making a character or object move too quickly through a scene meant to be somber will not convey the right mood. Similarly, a slow character in a happy or upbeat scene will seem odd. This is why the glum character Eeyore from Winnie the Pooh seems so dull and sad.
Exaggeration
While an animator should always strive to make their work realistic, it is okay to push that boundary. Just as with the previous rule, animators can break away from realism in some areas because their creations exist in a fictional realm. Breaking the rule of realism adds interest, conveys emotions, and can create comical scenes.
This is where the idea of exaggeration comes into play. Animators will exaggerate the actions of certain characters or objects. Think about steam pouring out of the ears of a furious villain or a Looney Tunes’ character whose eyes bug out of their head. This is exaggeration. It gives a character have visual personality or add interest to movement.
Most often, animators will use exaggeration for comedy. Take Robin Williams’ character, Genie, for example.
GIF courtesy of GIPHY.
Throughout Disney’s Aladdin, Genie’s actions and facial expressions are almost always exaggerated. This choice on the animator’s part compliments Williams’ comedic acting style and contributes largely to Genie’s character.
Solid Drawing
The concept of solid drawing has little to do with movement and more to do with the concepts taught in basic drawing courses.
Animators are creating three-dimensional characters, even in traditional, two-dimensional animation methods. Therefore, they must know what methods or techniques make objects look 3D. This ties back to understanding elements like anatomy, light and shadows, and how to draw a character so that they look like they have volume.
Lacking knowledge in any of these areas can result in characters who look flat, disproportionate, or awkward.
Appeal
The final rule of The Twelve Principles of Animation also has less to do with motion and more to do with basic drawing.
Appeal dictates that all characters or objects in an animation must be compelling in looks and personality, even the villains and monsters.
This is not to say that every character must have above average looks. Appeal and beauty are two different elements. Instead, this is the idea that a character should be designed well so that they stand out to an audience. Take the concept art of the character Mike Wazowski from Pixar’s Monster’s Inc. He is appealing without being attractive and his design reinforces his being a monster without being overly scary.

Image courtesy of Twitter user Matthew Luhn.
Besides, a character who is poorly designed and boring in personality will likely be forgotten before the lights even come back on in the movie theater.
The Twelve Principles of Animation are necessary for any animator to create realistic, believable work. No animation is complete without all twelve and novices hoping to break into the industry should learn them early on.
Still having trouble understanding them? Try watching this video to get a visual example of each of the twelve principles.
Bibliography
Mullen, Chris. “Frank Thomas: The Key-Playing Key Animator.” The Walt Disney Family Museum, 24 April 2017, http://www.waltdisney.org/blog/frank-thomas-key-playing-key-animator. Accessed 4 May 2019.
“Remembering Ollie Johnston.” Animation World Network, 19 Aug. 2008, http://www.awn.com/animationworld/remembering-ollie-johnston. Accessed 4 May 2019.
Ritchie, James. “The 12 Principles of Animation … With Animated Examples!” Idea Rocket Animation, 19 July 2017, http://www.idearocketanimation.com/13721-12-principles-of-animation-gifs/. Accessed 9 April 2019.
“The 12 Principles of Animation.” CGTarian Animation & VFX Online School, http://www.cgtarian.com/animation-tutorials/disney-animation-principles.html. Accessed 10 April 2019.
“The 12 Principles of Animation as Illustrated through Disney and Disney Pixar Blogs.” Oh My Disney, http://www.ohmy.disney.com/movies/2016/07/20/twelve-principles-animation-disney/. Accessed 10 April 2019.
“Understanding the 12 Principles of Animation.” Plural Sight, 11 Aug. 2014, http://www.pluralsight.com/blog/film-games/understanding-12-principles-animation. Accessed 10 April 2019.
Yi Chie, Teoh. “Book Review: The Illusion o Life: Disney Animation.” Parka Blogs, 22 May 2010. http://www.parkablogs.com/content/book-review-illusion-of-life-disney-animation. Accessed 9 April 2019.
How to Create a Cel Animation
Video courtesy of YouTube user Puntadeleste.
The video above is more of an outdated promotional tool than it is a process video. Sexist undertones aside, it is still an excellent example of how cel animation is created. Disney’s process might differ from other studios, like Studio Ghibli’s, but the development of all cel animations have similar steps and components.
These major steps are just a small sequence in a larger process. Animation involves stages like budgeting, casting, audio production which will not be covered in this piece.
The main steps focused on in this article are those which can be found in nearly every animated feature’s production: storyboarding, animatic development, visual development, animation, ink-and-paint, and photography.
Storyboarding
Storyboarding is the first step of the cel animation process where a storyboard is created by storyboard artists and the director using the script as a reference.
A storyboard contains rough drawings of each scene in a layout like a comic book. They help create a rough, preliminary version of the final product. These drawings are often pinned to a bulletin board, so they can be rearranged as needed.

Photo courtesy of Mahermanblog.
Storyboards like the one above are used to organize thoughts, tweak ideas, and eliminate scenes before production. This is important as materials and manpower are costly. Therefore, redoing or removing scenes is easier at the beginning of the production, especially in cel animation.
Then, it will be distributed to all the animators and artists working on the film before the next step of animatic development.
Animatic Development
The next stage of the cel animation is the development of the animatic, also called a story reel.
Here, photographs of the storyboard drawings are paired together with audio that has already been recorded by voice actors. A scratch track, or rough draft of the musical score, is also included. The storyboard drawings and audio are edited together into a video, like the one below.
Video courtesy of YouTube user Pittwinn.
The production team views the story reel and uses it to correct any issues within the script itself. They will also decide on the timing of each shot. If the animatic raises issues with the story or storyboard, they are edited. A new story reel is created to include the changes and viewed again.
The animatic must be approved by the director before production can move on.
Visual development
Visual development is the third major step in the creation of cel animation. Character designers, art directors, color stylists, and the director work together in this stage to create the visual branding for the movie.
Character designers begin by drawing model sheets, which feature sketches of the individual characters drawn from all angles, like the example below. This maintains consistency in the characters’ appearances throughout the film.

Image courtesy of Kevin Langley of klangley.wordpress.
Meanwhile, the art directors and color stylists collaborate to create the color schemes for each character and scene.
The director approves all model sheets and choices made by the art directors and color stylists. These decisions and model sheets are compiled into books and distributed to all the animators and artists working on the film. They will act as a guide for the rest of production.
animation
Animating each frame of the movie is the next stage of the film’s production. The lead animator and assistant animators draw on thin sheets of transparent paper using colored pencils and the production books mentioned above.
The lead animator uses the storyboard to draw keyframes, which are the crucial poses or points of action in each scene. So, if they were animating a race, the lead animator might draw a runner at the starting line, a few frames of them running, and the runner crossing the finishing line.
The gaps between these frames are filled by assistant animators, or inbetweeners, in a process known as tweening. Their work may be changed multiple times to the lead animator’s liking.
The animators check the actions of the characters and the pacing of the scene as they draw to ensure dialogue will match the characters’ lips and the scene will coincide with the soundtrack.
A pencil test of the scene is created after the lead or assistant animators finish a sequence. These are done in pencil and are photographs of each drawing played back at twelve or twenty-four frames per second. They act as a rough draft of the final scene that can be reviewed and critiqued by all the animators and director, so changes can be made before the next sequence is drawn.
GIF courtesy of GIPHY.
Background artists paint backgrounds for each scene during the animation process using either acrylics, gouache, or watercolor. These are the most detailed pieces of art created for the film since the background appears for the longest times.
Ink-and-paint
The fifth stage of cel animation is the ink-and-paint stage. The inkers and colorists are instrumental in this step as they transfer the animators’ drawings from paper to cels.
Each hand-drawn frame is sent to the inking department where the basic linework is transferred to the front side of the thin plastic sheets known as cels.
The colorists receive the inked cels once they have dried. They apply cel paint made of acrylics or gouache to the back side of the cel to keep the ink fresh and the lines concise. This process can be seen in the image below.

Image courtesy of Christopher DeStefano.
The cel paint must dry before the cels are delivered to photography department and the photography stage can begin.
Photography
Photography is the final stage of the cel animation process. The inked and colored cels are delivered to the photographers.
The cels of one frame are stacked on top of one another. The background is placed beneath the cels and a frame of glass is fitted between the cels and a specialized camera known as a rostrum camera, as seen below. The cels are photographed and replaced with the next frame.

Image courtesy of Bob Egby of Moor Hall Picture Gallery.
This intricate process can last for years at a time and can be incredibly challenging for the dozens of artists involved. However, something magical exists within this animation method and in bringing stationary, inanimate drawings to life.
Bibliography
Basile, Nancy. “Learn the Basics of Cel Animation.” ThoughtCo., 20 Oct. 2017, http://www.thoughtco.com/cel-animation-on-the-simpsons-137759. Accessed 23 March 2019.
“How Does Cel Animation Work?” Future Learn, http://www.futurelearn.com/courses/explore-animation/0/steps/12225. Accessed 23 March 2019.
Heginbotham, Claire. “What is Cel Animation & How Does it Work?” Concept Art Empire, http://www.conceptartempire.com/cel-animation/. Accessed 27 February 2019.
Klazema, April. “2D Animation: A Comprehensive Guide to the Fundamentals.” Udemy, 3 March 2014, http://www.blog.udemy.com/2d-animation-2/. Accessed 24 February 2019.
Moreno, Laura. The Creation Process of 2D Animated Movies. 30 Oct. 2014, http://www.edubcn.cat/rcs_gene/treballs_recerca/2014-2015-02-4-TR_baixa.pdf. Accessed 28 February 2019.
Shaver, Allen. “2D Animation Process.” Animation Academy, 2011, http://www.multimediamcc.com/old-students/ashaver/2d_process.html. Accessed 25 February 2019.
“Walt Disney Studios Animation.” Just Disney, http://www.justdisney.com/animation/animation.html. Accessed 23 March 2019.
